The fountain set will be broken into 2 parts. Part 1: Creation, Part 2: Painting and adding water!
Making the Fountain. Part 1: Creation
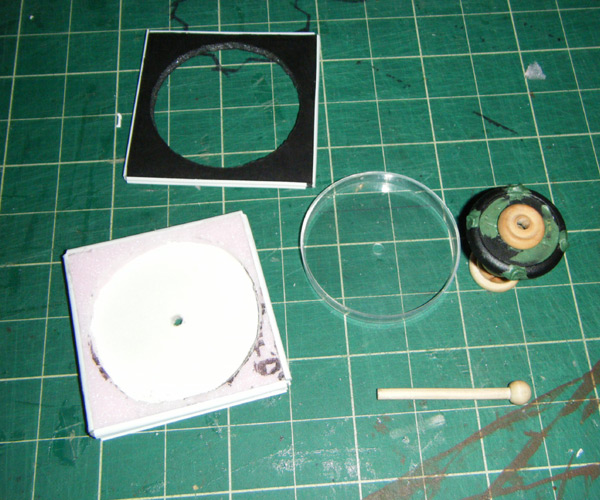
STEP 1: Gather your materials
Basic materials used for creation of the fountain base. Here we have some pink insulation foamboard, picked up from your local hardware store this is 1" thick. The white sheet is your average white foamboard (1/4" thick), picked up from loacal arts & crafts store (or Walmart if you can). A sharp, sharp knife. And last we have our base, a lid from a Gale Force 9 terrain effects container. Dont forget our trusty cutting mat.

STEP 2: Size up the container
We cut the pink foam down to size, the fountain is a 3"x3" area base, leaving a 1/4" around the sides to hold the container lid.

Next we press the lid down into the pink foam to get the rough size that the lid will fit into.

Cut away the middle, its ok to cut into the foam like I did here.

Now we get to dry fit the container lid into the pink foam. See almost a perfect fit.

You may notice I used black foamboard here. There is no difference to use black or white, just what you have available and the right size.
STEP 3: Tippity top
Now we take some of our foamboard (black or white 1/4" thick), and cut a square of 3 1/4"x3 1/4".
Next we again line up the container lid. trace an outline, then cut away the middle. This will serve as the top area of the fountain, hence the overlap of size.

STEP 4: Bottom of the heap.
Now take more foamboard, white in this case, and cut out 2 3"x3" squares. This will serve as the bottom of the fountain.


a dry fit of all our pieces is shown here.
STEP 5: Adding details
You can see here in this step (sorry no how to pics), I added some detail to the edges of the fountain. What I did here is simply explained:
FIRST we glued (using our white glue, PVA, or other basic glue) the pink foam to the 2 white foamboard layers, sizing them up straight with each other. Any excess was trimmed off, remember we want a 3"x3" area.
NEXT we took some hobby styrene - these happen to be from Plastruct (you can get some on their website or most train hobby stores). On the bottom we have an I-beam (#90536), and on the top area is a half circle (or half round-#90886). Size them up and cut to shape.
LAST. Using a low temp Hot Glue gun, spread glue evenly (working one side at a time) and place the strips onto the fountain base. This executes 2 things at once. First, it makes the fountain look better than plain sides. Second, it protects the foam from any paint that may damage it.

STEP 6: Putting it all together
Now we assemble. Again dry fit first to make sure all parts line up and to make one last adjustment. The stem peg (from yesterday) is still removable. You want the base of the fountain, then the container lid. Fit the top of the fountain (the black foamboard) ontop. Center the stem in the middle of the fountain, and put a drop of paint onto the bottom of the peg. As you drive the peg thru the stem it should makr where it will come out onto the container lid. This is where we will want to drill a hole thru. This will allow the peg to pass thru the complete fountain.
Here we see the dry fit, the stem in the center and the peg marking where I need to drill the hole.

STEP 7: Assemble!
Container lid is slotted into the bottom of the fountain. Hot glue is used to join the two. Add the top of the fountain (again using hot glue). The Fountain stem is joined to the inverted lid with...hot glue. The peg is still removable.

And there you have the fountain assembled. Next we go into the painting and adding water!
No comments:
Post a Comment